A video on how to upload images to your website. Also some tips on resizing.
Download Artweaver hereUsing Artweaver to Resize Pictures.pdf
Using Artweaver to Resize Pictures
There is a free application called Artweaver, which is highly recommended for resizing pictures. You
can download it at http://www.artweaver.de/en/download. Once installed (just click on Next until
finished) you have a very powerful image editing application without the expense of Photoshop.
To resize an image you need to:
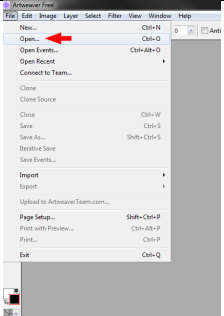
Open the application and then click on
File – Open to find the photo you wish to
resize.

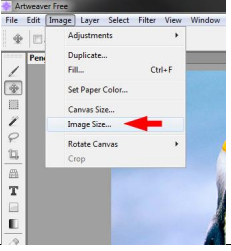
When the image has opened, click on the
Image menu and choose Image Size.

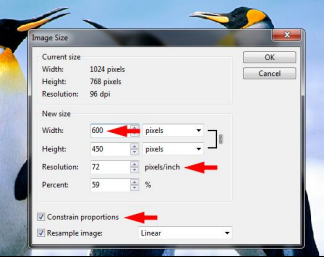
There are two things to amend here, the
Resolution and the Width.
Change the Resolution to 72 pixels/inch
Change the Width to 600 (max size, but
this depends on where you are placing
the image).
Please ensure that you keep the
Constrain Proportions button ticked,
otherwise you will get a distorted image.

Click on OK when done and the image
will shrink.
Click on File - Save As to save a copy of
the image. Give the copy a new name
(making sure to only use letters,
numbers, spaces, underscores (_) and
hyphens (-)). Choose the image type as a
JPEG and click Save.
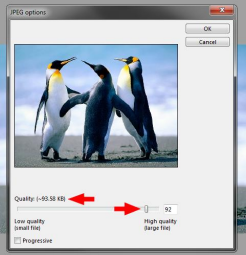
You will now get a box with a slider
allowing you to change the image quality.
You will notice that there is an indicator
to how big the file will be, so adjust the
slider bar to get the best quality, but
keeping the image under 100KB. When
happy, click OK and you’re done.

Now you just need to upload the image to the website as normal.
If you need to rotate the image before resizing, you can also do that in the Image Menu.
